IR Remote
This article will show you the process of setting up the IR remote control.

Step 1 — Flashing
Take the device from the box and connect it to the computer. Then go to the website webflasher.robonomics.network. This is the web flasher.
In “Firmware” drop-box choose “IR REMOTE” option and next in “SELECT CHIP” choose “ESP32”. Press “CONNECT” button.
A popup window will appear where you should select the serial port to which the device is connected (usually it’s /ttyUSB0). Then choose “INSTALL IR-REMOTE_EN”.
On next window, you can make CLEAR INSTALLATION by check ERASE DEVICE. Press Next and then Install. Wait until firmware to upload to the IR controller.
After finishing the installation process Wi-Fi configuration popup will appear. There you have options:
- You can provide Wi-Fi credentials, skip Step 2 - Access Point and go to Step 3 - Configuration.
After setting up Wi-Fi you can visit device via VISIT DEVICE button. Later you can visit device via it’s IP address in the network. To find it you can use Fing mobile app or
nmap CLI tool.
- Or disconnect the device from the computer and connect it to the power supply. IR Remote will start and create a Wi-Fi hotspot. To connect the IR Remote to your home Wi-Fi network through a hotspot, follow the instructions in Step 2.
Step 2 — Access Point
If you take IR Remote from the box and connect it to the power supply, it will create hotspot with name “tasmota-XXXXXXX”. Connect to it. Configuration window should open. If not, open web-browser and go to 192.168.4.1 page.
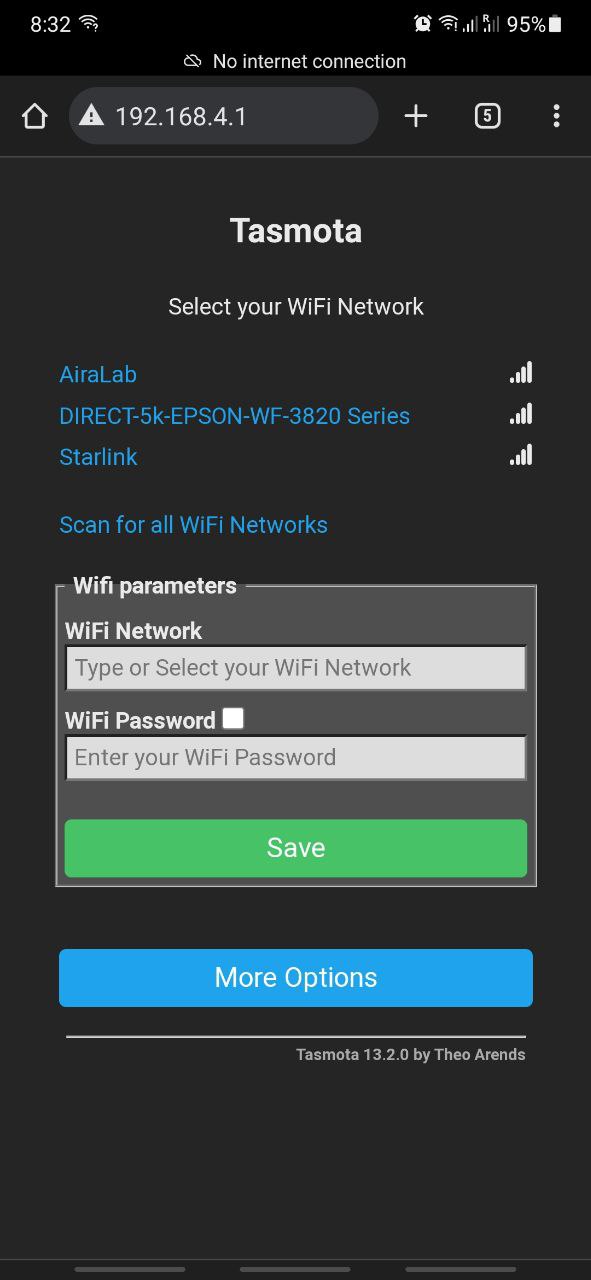
Provide Wi-Fi credentials. After that the IR Remote will connect to Wi-Fi network. Check the device via it’s IP address in the network. To find it you can use Fing mobile app or
nmap CLI tool.
Step 3 — Configuration
Go to “Configuration”->“Configure other”. In “Template” string insert next:
{"NAME":"Robonomics IR remote","GPIO":[1,1,1,1,1056,1088,1,1,1,1,1,1,1,1,1,1,0,1,1,1,0,1,1,1,0,0,0,0,1,1,1,1,1,0,0,1],"FLAG":0,"BASE":1}Verify that checkbox “Activate” and “MQTT Enable” is enabled. If not, enable it and press Save button.
Return to “Main Menu” and go to “Configuration” -> “Configure MQTT”.
Provide your MQTT credentials here:
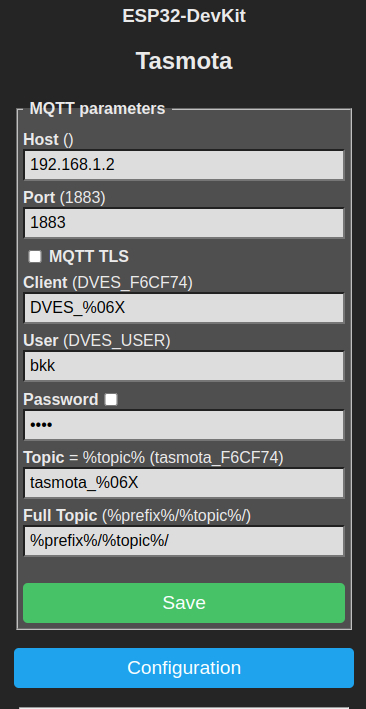
That’s all with ESP for now. The next step is to install the Home Assistant integration.
Step 4 — Integration Setup
This article assumes, that you have Home Assistant and HACS. Go to HACS and add custom repository.
To do this, press three dots in upper right corner, choose CUSTOM REPOSITORIES
and insert this URL: https://github.com/hristo-atanasov/Tasmota-IRHVAC. in Category choose “Integration”. After that find it in search and install it. Don’t forget to restart Home Assistant after that.
Open logs of the IR remote. To do this go to proper local URL, or open again webflasher.robonomics.network and choose “Tasmota IR” and “ESP32”. Press “Connect” and choose port.
Press VISIT DEVICE, and you will see the device main page. Go to “Consoles” -> “console”.
Point your IR remote control (e.g. from an air conditioner) to the Robonomics IR Remote and press buttons on the remote. You will get next log in the console:
10:08:06.925 MQT: tele/tasmota_F6CF74/RESULT = {"IrReceived":{"Protocol":"MITSUBISHI112","Bits":112,"Data":"0x23CB260100A003060D00000000CB","Repeat":0,"IRHVAC":{"Vendor":"MITSUBISHI112","Model":-1,"Mode":"Cool","Power":"Off","Celsius":"On","Temp":25,"FanSpeed":"Medium","SwingV":"Highest","SwingH":"Auto","Quiet":"Off","Turbo":"Off","Econo":"Off","Light":"Off","Filter":"Off","Clean":"Off","Beep":"Off","Sleep":-1}}}
You need information from IRHVAC topic.
Open configuration.yaml file of our Home Assistant instance and insert the following:
tasmota_irhvac:

climate:
  - platform: tasmota_irhvac
    name: "<Some Name Here>"
    command_topic: "cmnd/<your_tasmota_device>/irhvac"
    # Pick one of the following:
    # State is updated when the tasmota device receives an IR signal (includes own transmission and original remote)
    # useful when a normal remote is in use alongside the tasmota device, may be less reliable than the second option.
    state_topic: "tele/<your_tasmota_device>/RESULT"
    # State is updated when the tasmota device completes IR transmission, should be pretty reliable.
    #state_topic: "stat/<your_tasmota_device>/RESULT"
    # Uncomment if your 'available topic' of Tasmota IR device are different (if device in HA is disabled)
    #availability_topic: "tele/<your_tasmota_device>/LWT"
    temperature_sensor: <temperature sensor in room> - # required to measure temperature in a room. e.x. sensor.kitchen_temperature
    humidity_sensor: None #optional - default None (e.x. sensor.kitchen_humidity)
    power_sensor: None #optional - default None (e.x. binary_sensor.kitchen_ac_power)
    vendor: "<Your vendor here>" #find your vendor in logs.
    min_temp: 16 #optional - default 16 int value
    max_temp: 32 #optional - default 32 int value
    target_temp: 26 #optional - default 26 int value
    initial_operation_mode: "off" # optional - default "off" string value (one of the "supported_modes")
    away_temp: 24 #optional - default 24 int value
    precision: 1 #optional - default 1 int or float value. Can be set to 1, 0.5 or 0.1
    supported_modes:
      - "heat"
      - "cool"
      - "dry"
      - "fan_only" # Use "fan_only" even if Tasmota shows "Mode":"Fan"
      - "auto"
      - "off" #Turns the AC off - Should be in quotes
      # Some devices have "auto" and "fan_only" switched
      # If the following two lines are uncommented, "auto" and "fan" should be commented out
      #- "auto_fan_only" #if remote shows fan but tasmota says auto
      #- "fan_only_auto" #if remote shows auto but tasmota says fan
    supported_fan_speeds:
      # Some devices say max,but it is high, and auto which is max
      # If you uncomment the following two, you have to comment high and max
      # - "auto_max" #woud become max
      # - "max_high" #would become high
      #- "on"
      #- "off"
      #- "low"
      - "medium"
      - "high"
      #- "middle"
      #- "focus"
      #- "diffuse"
      - "min"
      - "max"
      #- "auto"
    supported_swing_list:
      - "off"
      - "vertical" #up to down
      # - "horizontal" # Left to right
      # - "both"
    default_quiet_mode: "Off" #optional - default "Off" string value
    default_turbo_mode: "Off" #optional - default "Off" string value
    default_econo_mode: "Off" #optional - default "Off" string value
    hvac_model: "-1" #optional - default "1" string value
    celsius_mode: "On" #optional - default "On" string value
    default_light_mode: "Off" #optional - default "Off" string value
    default_filter_mode: "Off" #optional - default "Off" string value
    default_clean_mode: "Off" #optional - default "Off" string value
    default_beep_mode: "Off" #optional - default "Off" string value
    default_sleep_mode: "-1" #optional - default "-1" string value
    default_swingv: "high" #optional - default "" string value
    default_swingh: "left" #optional - default "" string value
    keep_mode_when_off: True #optional - default False boolean value : Must be True for MITSUBISHI_AC, ECOCLIM, etc.
    toggle_list: #optional - default []
      # The toggled property is a setting that does not retain the On state.
      # Set this if your AC properties are toggle function.
      #- Beep
      #- Clean
      #- Econo
      #- Filter
      #- Light
      #- Quiet
      #- Sleep
      #- SwingH
      #- SwingV
      #- Turbo
Change all necessary statements in inserted part with values from console message. As result, part of your configuration file should look similar to this
(in example unused statement was deleted):
tasmota_irhvac:

climate:
  - platform: tasmota_irhvac
    name: "bangkok climate control"
    unique_id : "bangkok test climate"
    command_topic: "cmnd/tasmota_F6CF74/irhvac"
    state_topic: "tele/tasmota_F6CF74/RESULT"
    temperature_sensor: sensor.robonomicssensor_36133_temperature_2
    vendor: "MITSUBISHI112"
    min_temp: 16 #optional - default 16 int value
    max_temp: 31 #optional - default 32 int value
    target_temp: 25 #optional - default 26 int value
    initial_operation_mode: "cool"
    supported_modes:
      - "cool"
      - "dry"
      - "fan_only" # Use "fan_only" even if Tasmota shows "Mode":"Fan"
      - "auto"
      - "off" #Turns the AC off - Should be in quotes
      # Some devices have "auto" and "fan_only" switched
      # If the following two lines are uncommented, "auto" and "fan" shoud be commented out
      #- "auto_fan_only" #if remote shows fan but tasmota says auto
      #- "fan_only_auto" #if remote shows auto but tasmota says fan
    supported_fan_speeds:
      # Some devices say max,but it is high, and auto which is max
      # If you uncomment the following two, you have to comment high and max
      # - "auto_max" #woud become max
      # - "max_high" #would become high
      - "low"
      - "medium"
      - "max"
      - "auto"
    supported_swing_list:
      - "off"
      - "vertical" #up to down

    hvac_model: "-1" #optional - default "1" string value

    keep_mode_when_off: True #optional - default False boolean value : Must be True for MITSUBISHI_AC, ECOCLIM, etc.
Save configuration.yaml and restart Home Assistant.
After restarting you can add in UI a new thermostat card and select the newly integrated device.

If you have problem with GUI mode, switch to “CODE EDITOR” and write next:
type: thermostat
entity: climate.<your climate name>
Couldn't complete
It was hard
It was ok
It was easy
Make a contribution
Robonomics wiki is open source. See something that's wrong or unclear? Submit a pull request.