Home Server on RISC-V
This article will provide the instruction how to set up a fully open-source smart home on RISC-V.
Hardware Requirements
- StarFive VisionFive 2 SBC
- USB-TTL Cable
- SD Card
Ubuntu Installation
Image
At the moment of writing this manual the last LTS release is Ubuntu 24.04 LTS
Write the image on the SD card using balenaEtcher for example
Boot from SD card on VisionFive 2
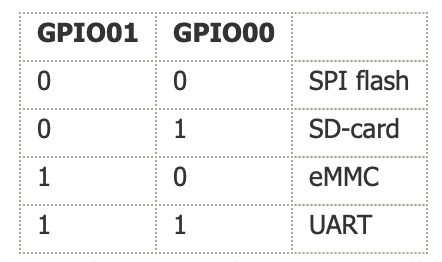
In order to boot from SD card we need to put DIP switches in right positions
https://wiki.ubuntu.com/RISC-V/StarFive VisionFive 2

For the SD card boot we need to set the DIP switch to 0 1
There were no internet so we had to use USB-TTL cable to connect to the computer’s console. Here’s the instruction on how to connect the cable
After The First Boot
By default the login and password are ubuntu. After the first boot the system will ask you to change the password.
The image assumes that you are using version v1.3B of the board (see silkprint on the board). If you are using board version v1.2A, please proceed as follows:
echo 'StarFive VisionFive 2 v1.2A' | sudo tee /etc/flash-kernel/machine
sudo flash-kernel $(uname -r)
sudo update-grub
sudo reboot
Yggdrasil Installation
sudo apt install golang-go

cd ~
git clone https://github.com/yggdrasil-network/yggdrasil-go
cd yggdrasil-go
./build

./yggdrasil -genconf > yggdrasil.conf
sudo cp yggdrasil.conf /etc/yggdrasil.conf

sudo cp {yggdrasil,yggdrasilctl} /usr/bin/
sudo groupadd --system yggdrasil
sudo cp contrib/systemd/yggdrasil.service /etc/systemd/system
sudo systemctl daemon-reload

sudo systemctl enable yggdrasil
sudo systemctl start yggdrasil

# Check
systemctl status yggdrasil
Home Assistant Core Installation
We will follow this article from the official Home Assiatant documentation
Dependencies
# Update the system
sudo apt-get update
sudo apt-get upgrade -y

# HA Core dependencies
sudo apt-get install -y python3 python3-dev python3-venv python3-pip bluez \
libffi-dev libssl-dev libjpeg-dev zlib1g-dev autoconf build-essential \
libopenjp2-7 libtiff6 libturbojpeg0-dev tzdata ffmpeg liblapack3 liblapack-dev \
libatlas-base-dev

# The following packages are not installed automatically so we install it manually
sudo apt-get install -y libavcodec-dev libavformat-dev libavutil-dev \
libavdevice-dev libavfilter-dev libswscale-dev pkg-config \
cmake libopenblas-dev

# From HA Core installation
sudo useradd -rm homeassistant
sudo mkdir /srv/homeassistant
sudo chown homeassistant:homeassistant /srv/homeassistant
sudo -u homeassistant -H -s

cd /srv/homeassistant
python3 -m venv .
source bin/activate
python3 -m pip install wheel

# And some more dependencies
python3 -m pip install numpy==1.26.0 PyTurboJPEG==1.7.5
Rust Installation
Continue working under homeassistant user
curl --proto '=https' --tlsv1.2 -sSf https://sh.rustup.rs | shLogout and login again to make the rust packages available
HA Installation
Be patient, this step will take time because a lot of dependencies are built from source
pip3 install homeassistant==2024.9.3HA Launch
Under homeassistant user and inside venv run
hassAfter Home Assistant starts, go to the dashboard with http://[RISC-V IP ADDRESS]:8123/
Let’s make a systemd service to make it run automatically. Stop hass and create a service file:
sudo nano /etc/systemd/system/homeassistant.service[Unit]
Description=Home Assistant
After=network-online.target
[Service]
Type=simple
User=homeassistant
WorkingDirectory=/home/homeassistant/.homeassistant
ExecStart=/srv/homeassistant/bin/hass -c "/home/homeassistant/.homeassistant"
RestartForceExitStatus=100
[Install]
WantedBy=multi-user.targetsudo systemctl start homeassistant.service
sudo systemctl enable homeassistant.service
# Check the service is up and running
systemctl status homeassistant.serviceMosquitto Installation
sudo apt install mosquitto mosquitto-clients
sudo mosquitto_passwd -c /etc/mosquitto/passwd mosquitto
sudo systemctl restart mosquitto

# Check the service
systemctl status mosquitto
Zigbee2MQTT Installation
Reference article from the official zigbee2mqtt manual
These commands are run under ubuntu user:
# Zigbee adapter location
ls -l /dev/serial/by-id
# lrwxrwxrwx 1 root root 13 Aug  8 14:51 usb-ITEAD_SONOFF_Zigbee_3.0_USB_Dongle_Plus_V2_20230803183548-if00 -> ../../ttyACM0

# Install dependencies
sudo curl -fsSL https://deb.nodesource.com/setup_20.x | sudo -E bash -
sudo apt-get install -y nodejs git make g++ gcc libsystemd-dev

# Add user to dialout group
sudo adduser ubuntu dialout
Logout and login
# It's easier to install npm from the repo
sudo apt-get install -y npm

# Download and build zigbee2mqtt
sudo mkdir /opt/zigbee2mqtt
sudo chown -R ${USER}: /opt/zigbee2mqtt
git clone --depth 1 https://github.com/Koenkk/zigbee2mqtt.git /opt/zigbee2mqtt
cd /opt/zigbee2mqtt
npm ci
npm run build

# Edit configuration file
cp /opt/zigbee2mqtt/data/configuration.example.yaml /opt/zigbee2mqtt/data/configuration.yaml
nano /opt/zigbee2mqtt/data/configuration.yaml
Put your mqtt login and password (if set) and zigbee adapter location:
# Home Assistant integration (MQTT discovery)
homeassistant: true

# Enable the frontend, runs on port 8080 by default
frontend:
  port: 8099
# MQTT settings
mqtt:
  # MQTT base topic for zigbee2mqtt MQTT messages
  base_topic: zigbee2mqtt
  # MQTT server URL
  server: 'mqtt://localhost'
  # MQTT server authentication, uncomment if required:
  user: mosquitto
  password: risc-v

# Serial settings
serial:
  # Location of CC2531 USB sniffer
  port: /dev/ttyACM0

# Advanced settings
advanced:
  # Let Zigbee2MQTT generate a network key on first start
  network_key: GENERATE
  # Let Zigbee2MQTT generate a pan_id on first start
  pan_id: GENERATE
  # Let Zigbee2MQTT generate a ext_pan_id on first start
  ext_pan_id: GENERATE
Launch zigbee2MQTT
npm startIf everything is ok, let’s create a systemd service:
sudo nano /etc/systemd/system/zigbee2mqtt.service[Unit]
Description=zigbee2mqtt
After=network.target
[Service]
Environment=NODE_ENV=production
Type=notify
ExecStart=/usr/bin/node index.js
WorkingDirectory=/opt/zigbee2mqtt
StandardOutput=inherit
# Or use StandardOutput=null if you don't want Zigbee2MQTT messages filling syslog, for more options see systemd.exec(5)
StandardError=inherit
WatchdogSec=10s
Restart=always
RestartSec=10s
User=ubuntu
[Install]
WantedBy=multi-user.targetsudo systemctl start zigbee2mqtt.service
sudo systemctl enable zigbee2mqtt.service
# Check the service
systemctl status zigbee2mqtt.serviceYou can find the zigbee2mqtt dashboard at http://[RISC-V IP ADDRESS]:8099/
IPFS Installation
The following command are run under ubuntu user:
cd
nano .profile
export PATH=$PATH:/usr/local/go/bin
export PATH=$PATH:$GOPATH/binRelogin from user and build the package:
git clone https://github.com/ipfs/kubo.git
cd kubo
make build
sudo mv cmd/ipfs/ipfs /usr/local/bin/
Before the first run:
ipfs init
ipfs config profile apply local-discovery
sudo nano /etc/systemd/system/ipfs-daemon.service
Create a systemd service:
[Unit]
Description=IPFS Daemon Service

[Service]
Type=simple
ExecStart=/usr/local/bin/ipfs daemon --enable-gc --migrate=true
User=ubuntu

[Install]
WantedBy=multi-user.target
sudo systemctl start ipfs-daemon.service
sudo systemctl enable ipfs-daemon.service
# Check the service
systemctl status ipfs-daemon.serviceLibp2p Proxy Installation
We will need our libp2p proxy package for peering communication with home server:
git clone https://github.com/PinoutLTD/libp2p-ws-proxy.git
cd libp2p-ws-proxy
npm install
node src/index.js
If everything is alright, let’s create a service:
sudo nano /etc/systemd/system/lp2p-proxy.service[Unit]
Description= Libp2p Proxy Service
[Service]
Type=simple
WorkingDirectory=/home/ubuntu/libp2p-ws-proxy/
ExecStart=/usr/bin/node src/index.js
User=ubuntu
Restart=always
RestartSec=5
[Install]
WantedBy=multi-user.targetsudo systemctl start lp2p-proxy.service
sudo systemctl enable lp2p-proxy.service
# Check the service
systemctl status lp2p-proxy.service
Robonomics Integration Installation
We prebuilt the wheels for convenience
sudo -u homeassistant -H -s
cd
source /srv/homeassistant/bin/activate
git clone https://github.com/PaTara43/py-bindings-wheels-risc-v
cd py-bindings-wheels-risc-v
pip3 install *
Install HACS
We will use HACS to install the integration. If HACS is not installed on your Home Assistant yet, you need to install it first.
Download Robonomics Integration
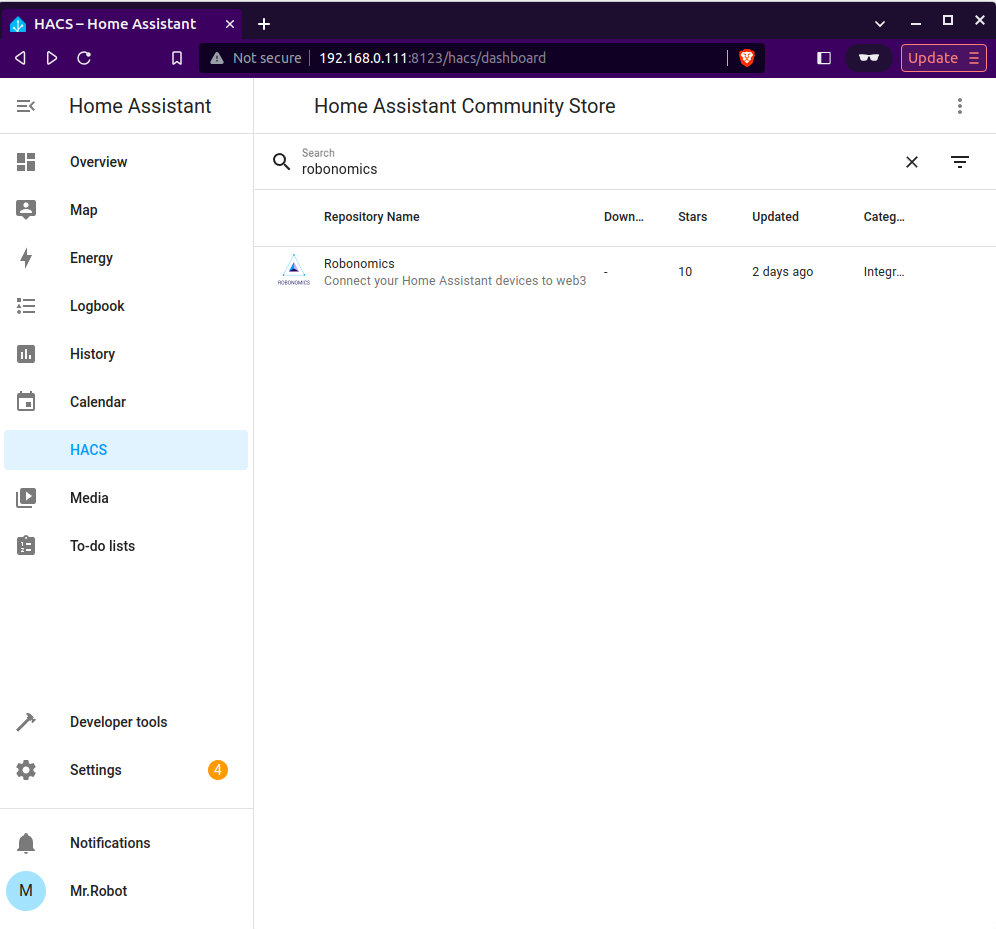
Next, in your Home Assistant, navigate to HACS and search for Robonomics:

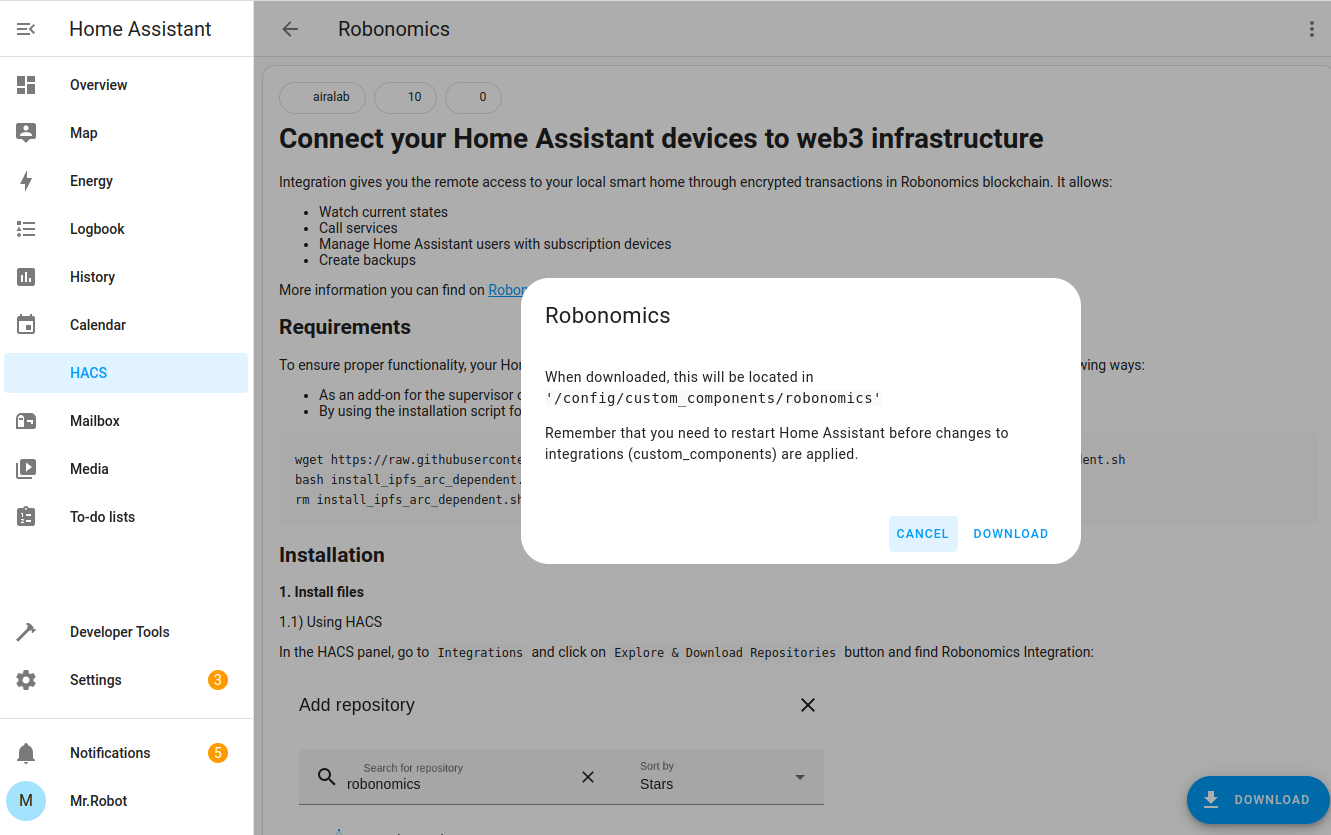
Open it and click Download in the bottom right corner. Downloading the repository may take some time.

That’s all. Now, you can continue to setup Robonomics Integration.
Couldn't complete
It was hard
It was ok
It was easy
Make a contribution
Robonomics wiki is open source. See something that's wrong or unclear? Submit a pull request.
