PTZ camera control in Home Assistant
This article covers a process of an PTZ camera set up in Home Assistant.
ONVIF protocol will be used. This requires a local camera account.
Requirements:
- PTZ camera
- Local camera account
- Camera IP address
- Configured Home Assistant
ONVIF integration
Let’s start with the installation of ONVIF integration.
Go to “Devices & Services” in “Settings” and press the “ADD INTEGRATION” button.
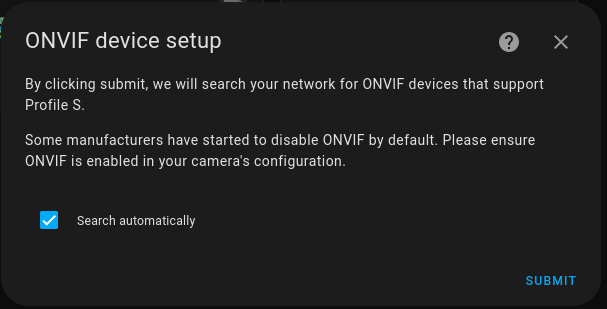
Type “ONVIF” and choose the integration. You will see the next window.

Press the “Submit” button. It will try to automatically search for your camera. If succeeded,
choose your camera from the list and fill in empty fields.
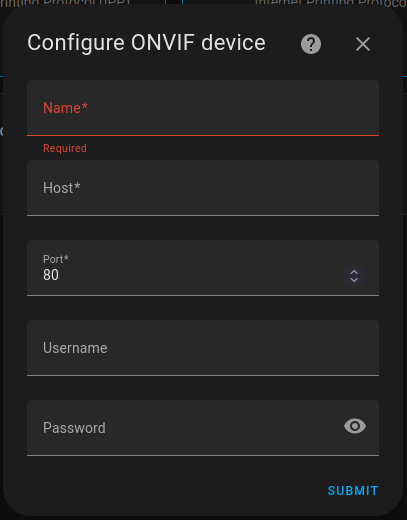
Otherwise, you have to fill in all the fields manually. You will see the following window.

Fill in the gaps:
- Name - give a name to your camera
- Host - provide The IP address of your camera
- Port - mostly common it’s 2020, but your camera provider may change it
- Username - write a username of your camera local account
- Password - write a password for your camera local account
and press “Submit”. Choose an Area for your camera and click on “Finish”.
Add camera control to the dashboard
Now that you have fully set up the camera, you may add its stream and control buttons to the dashboard.
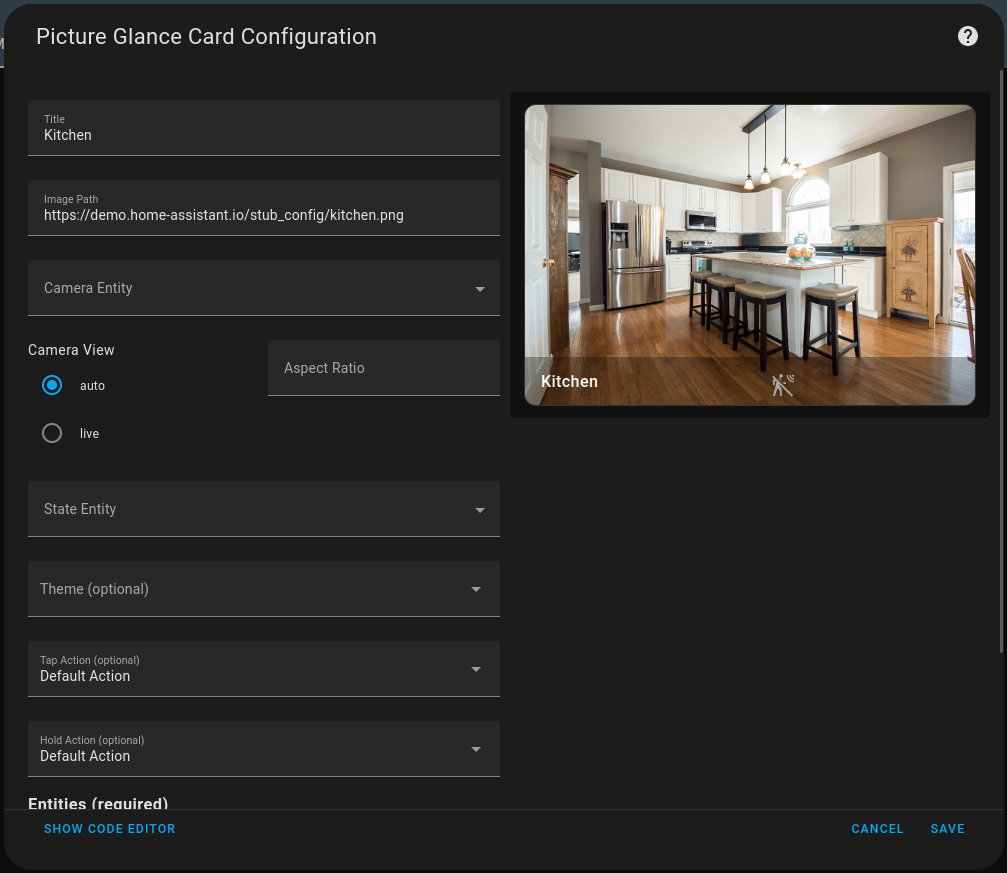
Go to the dashboard and start with creating a new card. Choose the “Picture Glance” one.

Fill in the data:
- Title - choose camera image title
- Camera Entity - choose a camera entity from the drop-down list
- Camera View - choose “live” to get less delay
Next, switch to “Code Editor” mode by pressing the button at the bottom left side. You will see the following code:
camera_view: live
type: picture-glance
title: Kitchen
image: https://demo.home-assistant.io/stub_config/kitchen.png
entities: []
camera_image: camera.tapo_mainstream
Replace the content of entities: [] according to the example below (<YOUR_CAMERA_ENTITY> is the same as the camera_image parameter):
entities:
  - entity: <YOUR_CAMERA_ENTITY>
    tap_action:
      action: call-service
      service: onvif.ptz
      service_data:
        entity_id: <YOUR_CAMERA_ENTITY>
        pan: LEFT
        speed: 1
        distance: 0.3
        move_mode: ContinuousMove
    name: Pan Left
    show_state: false
    icon: 'mdi:arrow-left'
    show_icon: true
  - entity: <YOUR_CAMERA_ENTITY>
    tap_action:
      action: call-service
      service: onvif.ptz
      service_data:
        entity_id: <YOUR_CAMERA_ENTITY>
        tilt: UP
        speed: 1
        distance: 0.3
        move_mode: ContinuousMove
    name: Tilt Up
    icon: 'mdi:arrow-up'
  - entity: <YOUR_CAMERA_ENTITY>
    tap_action:
      action: call-service
      service: onvif.ptz
      service_data:
        entity_id: <YOUR_CAMERA_ENTITY>
        tilt: DOWN
        speed: 1
        distance: 0.3
        move_mode: ContinuousMove
    name: Tilt Down
    icon: 'mdi:arrow-down'
  - entity: <YOUR_CAMERA_ENTITY>
    tap_action:
      action: call-service
      service: onvif.ptz
      service_data:
        entity_id: <YOUR_CAMERA_ENTITY>
        pan: RIGHT
        speed: 1
        distance: 0.3
        move_mode: ContinuousMove
    name: Pan Right
    icon: 'mdi:arrow-right'
    show_icon: true
That’s all. Now you should see the PTZ camera card on the dashboard along with control buttons.
Troubleshooting
If you are using Home Assistant Core and you don’t see a stream from the camera, you should install “stream” and “FFMPEG” integrations.
To do this, you should add stream: and ffmpeg: strings to the end of configuration.yaml.
Couldn't complete
It was hard
It was ok
It was easy
Make a contribution
Robonomics wiki is open source. See something that's wrong or unclear? Submit a pull request.

